AR.js+three.jsでwebAR(1)

blenderで作成した3DモデルをARで表示するまで。

①blenderでモデルをglbとしてエクスポート

②three.jsのGLTFLoaderでモデルを読み込み

③AR.jsでモデルを表示

という流れ。

blenderでモデルをエクスポート

フォーマットはglTF Binary(.glb)が一番軽いのでこれを選択。

パラメータはとりあえず以下のチェックが入っていればテクスチャ等もそのまま出力される様子。

※この時マテリアルをDeffuse BSDFにしたところブラウザの方でうまくテクスチャが反映されなかったので、Principled BSDFのままのほうがいいっぽい。

html側の記述

Plain text
Copy to clipboard
Open code in new window
EnlighterJS 3 Syntax Highlighter
<!DOCTYPE html>
<html>
<head>
<title>AR test</title>
<meta name="viewport" content="width=device-width, user-scalable=no"/>
<script src="https://cdnjs.cloudflare.com/ajax/libs/three.js/r123/three.min.js"></script>
<script src="https://raw.githack.com/AR-js-org/AR.js/3.1.0/three.js/build/ar.js"></script>
<script src="https://cdn.jsdelivr.net/gh/mrdoob/three.js@r92/examples/js/loaders/GLTFLoader.js"></script>
<script src="three.js"></script>
</head>
<body style='margin : 0px; overflow: hidden;'></body>
</html>
<!DOCTYPE html> <html> <head> <title>AR test</title> <meta name="viewport" content="width=device-width, user-scalable=no"/> <script src="https://cdnjs.cloudflare.com/ajax/libs/three.js/r123/three.min.js"></script> <script src="https://raw.githack.com/AR-js-org/AR.js/3.1.0/three.js/build/ar.js"></script> <script src="https://cdn.jsdelivr.net/gh/mrdoob/three.js@r92/examples/js/loaders/GLTFLoader.js"></script> <script src="three.js"></script> </head> <body style='margin : 0px; overflow: hidden;'></body> </html>
<!DOCTYPE html>
<html>
    <head>
        <title>AR test</title>
        <meta name="viewport" content="width=device-width, user-scalable=no"/>
        <script src="https://cdnjs.cloudflare.com/ajax/libs/three.js/r123/three.min.js"></script>
        <script src="https://raw.githack.com/AR-js-org/AR.js/3.1.0/three.js/build/ar.js"></script>
        <script src="https://cdn.jsdelivr.net/gh/mrdoob/three.js@r92/examples/js/loaders/GLTFLoader.js"></script>
        <script src="three.js"></script>
    </head>
    <body style='margin : 0px; overflow: hidden;'></body>
</html>

・ビューポートの設定。画面をデバイスの大きさに合わせる。またスマホのズーム操作を禁止

・必要ソースの読み込み

・bodyタグで余白の除去とスクロールの禁止

three.js側の記述

まずARの表示に最低限必要な画面設定のみ

Plain text
Copy to clipboard
Open code in new window
EnlighterJS 3 Syntax Highlighter
window.addEventListener("DOMContentLoaded", init);
function init() {
//レンダラーの設定
const renderer = new THREE.WebGLRenderer({
antialias: true,
alpha: true
});
renderer.setClearColor(new THREE.Color(), 0);
renderer.setSize(640, 480);
renderer.domElement.style.position = 'absolute';
renderer.domElement.style.top = '0px';
renderer.domElement.style.left = '0px';
document.body.appendChild(renderer.domElement);
   
//画面設定
const scene = new THREE.Scene();
scene.visible = false;
const camera = new THREE.Camera();
scene.add(camera);
const light = new THREE.AmbientLight(0xFFFFFF, 1.0);
scene.add(light);
//画面リサイズの設定
window.addEventListener('resize', () => {
onResize();
});
function onResize() {
arToolkitSource.onResizeElement();
arToolkitSource.copyElementSizeTo(renderer.domElement);
if (arToolkitContext.arController !== null) {
arToolkitSource.copyElementSizeTo(arToolkitContext.arController.canvas);
}
};
//AR周りの設定
const arToolkitSource = new THREEx.ArToolkitSource({
sourceType: 'webcam'
});
arToolkitSource.init(() => {
setTimeout(() => {
onResize();
}, 2000);
});
const arToolkitContext = new THREEx.ArToolkitContext({
cameraParametersUrl: 'data/camera_para.dat',
detectionMode: 'mono'
});
arToolkitContext.init(() => {
camera.projectionMatrix.copy(arToolkitContext.getProjectionMatrix());
});
//マーカー設定
const marker1 = new THREE.Group();
scene.add(marker1);
const arMarkerControls = new THREEx.ArMarkerControls(arToolkitContext, marker1, {
type: 'pattern',
patternUrl: 'data/patt.hiro',
});
//レンダリング
requestAnimationFrame(function animate(){
requestAnimationFrame(animate);
if (arToolkitSource.ready) {
arToolkitContext.update(arToolkitSource.domElement);
scene.visible = camera.visible;
}
renderer.render(scene, camera);
});
}
window.addEventListener("DOMContentLoaded", init); function init() { //レンダラーの設定 const renderer = new THREE.WebGLRenderer({ antialias: true, alpha: true }); renderer.setClearColor(new THREE.Color(), 0); renderer.setSize(640, 480); renderer.domElement.style.position = 'absolute'; renderer.domElement.style.top = '0px'; renderer.domElement.style.left = '0px'; document.body.appendChild(renderer.domElement);     //画面設定 const scene = new THREE.Scene(); scene.visible = false; const camera = new THREE.Camera(); scene.add(camera); const light = new THREE.AmbientLight(0xFFFFFF, 1.0); scene.add(light); //画面リサイズの設定 window.addEventListener('resize', () => { onResize(); }); function onResize() { arToolkitSource.onResizeElement(); arToolkitSource.copyElementSizeTo(renderer.domElement); if (arToolkitContext.arController !== null) { arToolkitSource.copyElementSizeTo(arToolkitContext.arController.canvas); } }; //AR周りの設定 const arToolkitSource = new THREEx.ArToolkitSource({ sourceType: 'webcam' }); arToolkitSource.init(() => { setTimeout(() => { onResize(); }, 2000); }); const arToolkitContext = new THREEx.ArToolkitContext({ cameraParametersUrl: 'data/camera_para.dat', detectionMode: 'mono' }); arToolkitContext.init(() => { camera.projectionMatrix.copy(arToolkitContext.getProjectionMatrix()); }); //マーカー設定 const marker1 = new THREE.Group(); scene.add(marker1); const arMarkerControls = new THREEx.ArMarkerControls(arToolkitContext, marker1, { type: 'pattern', patternUrl: 'data/patt.hiro', }); //レンダリング requestAnimationFrame(function animate(){ requestAnimationFrame(animate); if (arToolkitSource.ready) { arToolkitContext.update(arToolkitSource.domElement); scene.visible = camera.visible; } renderer.render(scene, camera); }); }
window.addEventListener("DOMContentLoaded", init);

function init() {
    //レンダラーの設定
    const renderer = new THREE.WebGLRenderer({
        antialias: true,
        alpha: true
    });
    renderer.setClearColor(new THREE.Color(), 0);
    renderer.setSize(640, 480);
    renderer.domElement.style.position = 'absolute';
    renderer.domElement.style.top = '0px';
    renderer.domElement.style.left = '0px';
    document.body.appendChild(renderer.domElement);
   
    //画面設定
    const scene = new THREE.Scene();
    scene.visible = false;
    const camera = new THREE.Camera();
    scene.add(camera);
    const light = new THREE.AmbientLight(0xFFFFFF, 1.0);
    scene.add(light);

    //画面リサイズの設定
    window.addEventListener('resize', () => {
        onResize();
    });
    function onResize() {
        arToolkitSource.onResizeElement();
        arToolkitSource.copyElementSizeTo(renderer.domElement);
        if (arToolkitContext.arController !== null) {
            arToolkitSource.copyElementSizeTo(arToolkitContext.arController.canvas);
        }
    };
      
    //AR周りの設定
    const arToolkitSource = new THREEx.ArToolkitSource({
        sourceType: 'webcam'
    });
    arToolkitSource.init(() => {
        setTimeout(() => {
            onResize();
        }, 2000);
    });
    const arToolkitContext = new THREEx.ArToolkitContext({
        cameraParametersUrl: 'data/camera_para.dat',
        detectionMode: 'mono'
    });
    arToolkitContext.init(() => {
        camera.projectionMatrix.copy(arToolkitContext.getProjectionMatrix());
    });
    
    //マーカー設定  
    const marker1 = new THREE.Group();
    scene.add(marker1);
    const arMarkerControls = new THREEx.ArMarkerControls(arToolkitContext, marker1, {
        type: 'pattern',
        patternUrl: 'data/patt.hiro',
    });

    //レンダリング
    requestAnimationFrame(function animate(){
        requestAnimationFrame(animate);
        if (arToolkitSource.ready) {
            arToolkitContext.update(arToolkitSource.domElement);
            scene.visible = camera.visible;
        }
        renderer.render(scene, camera);
    });
}

arToolkitSource初期化時のリサイズ処理は2秒待つ処理を入れないと自分の環境ではうまくいかなかった(公式のexsampleでは意図的に待つ処理を入れている)。

モデルの読み込みと表示

GLTFローダーでモデルを読み込み、マーカーに対応させることで表示

Plain text
Copy to clipboard
Open code in new window
EnlighterJS 3 Syntax Highlighter
const gltfloader = new THREE.GLTFLoader();
gltfloader.load('./data/apple.gltf',function(gltf){
marker1.add(gltf.scene);
});
const gltfloader = new THREE.GLTFLoader(); gltfloader.load('./data/apple.gltf',function(gltf){ marker1.add(gltf.scene); });
      const gltfloader = new THREE.GLTFLoader();
      gltfloader.load('./data/apple.gltf',function(gltf){
          marker1.add(gltf.scene);
      });

・’./data/apple.gltf’はモデルデータのURL

・モデルそのものではなくシーンを追加していることに注意
three.jsでカスタム図形を作る(2)

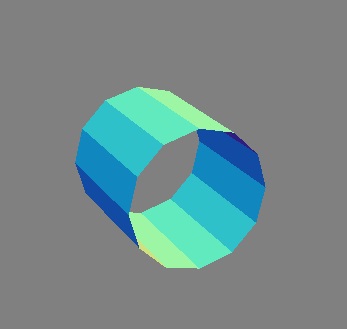
前回シンプルな四角い板を作ったので、今回はそれを応用して多角柱を作ってみる。

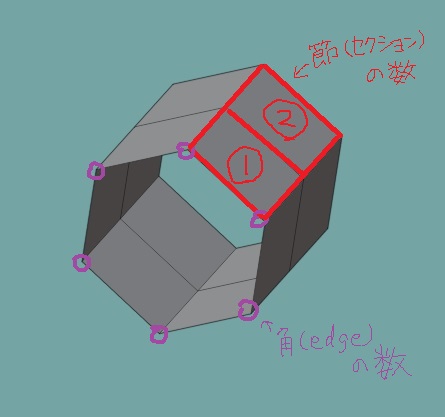
作りたい形のイメージ(六角柱)

①図形の座標を計算する

多角形を作り、セクションの数ぶん画面の奥に伸ばしていくイメージ。

ここでは六角形を2セクションぶんの奥行きで作ってみることにする。

Plain text
Copy to clipboard
Open code in new window
EnlighterJS 3 Syntax Highlighter
const sect = 2; //sectionの数
const edge = 6; //edgeの数
const size = 10; //1辺の長さ
const pt = []; //座標を入れる配列
for(let i=0; i<(sect+1); i++){
pt[i] = [];
let z = -size * i; //奥行き
for(let j=0; j<edge; j++){
let theta = j*2*Math.PI / edge;
let x = size * Math.cos(theta);
let y = size * Math.sin(theta);
pt[i][j] = [x, y, z];
}
}
const sect = 2; //sectionの数 const edge = 6; //edgeの数 const size = 10; //1辺の長さ const pt = []; //座標を入れる配列 for(let i=0; i<(sect+1); i++){ pt[i] = []; let z = -size * i; //奥行き for(let j=0; j<edge; j++){ let theta = j*2*Math.PI / edge; let x = size * Math.cos(theta); let y = size * Math.sin(theta); pt[i][j] = [x, y, z]; } }
  const sect = 2; //sectionの数
  const edge = 6; //edgeの数
  const size = 10; //1辺の長さ
  
  const pt = []; //座標を入れる配列
  for(let i=0; i<(sect+1); i++){
      pt[i] = [];
      let z = -size * i; //奥行き
          for(let j=0; j<edge; j++){
              let theta = j*2*Math.PI / edge;
              let x = size * Math.cos(theta);
              let y = size * Math.sin(theta);
              pt[i][j] = [x, y, z];
      }
  }

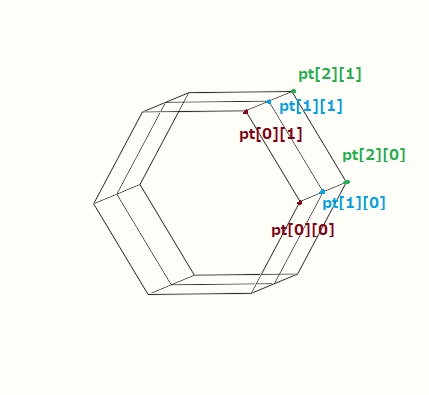
座標はptに下図のような順番で入る。(pt[2][0]以降は省略)

②verticesの作成

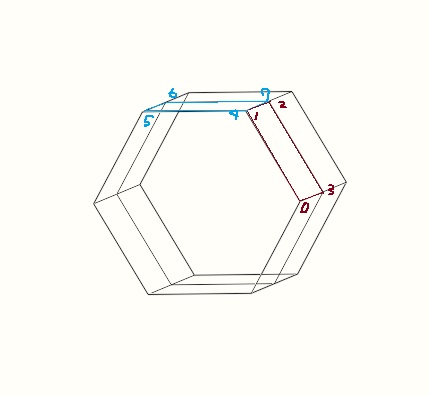
座標がこの順番のままだと面が貼れないので、四角のブロックごとに区切っていくように座標の順番を変えてverticesを作る。

Plain text
Copy to clipboard
Open code in new window
EnlighterJS 3 Syntax Highlighter
const vert = [];
for(let i=0; i<sect; i++){
vert[i] = [];
for(let j=0; j<edge; j++){
vert[i][j] = [];
vert[i][j][0] = pt[i][j];
vert[i][j][1] = pt[i][(j+1)%edge]; //edgeを一周回ったら0に戻る
vert[i][j][2] = pt[i+1][(j+1)%edge];
vert[i][j][3] = pt[i+1][j];
}
}
const vertices = new Float32Array(vert.flat(3)); //1次元配列に変換
const vert = []; for(let i=0; i<sect; i++){ vert[i] = []; for(let j=0; j<edge; j++){ vert[i][j] = []; vert[i][j][0] = pt[i][j]; vert[i][j][1] = pt[i][(j+1)%edge]; //edgeを一周回ったら0に戻る vert[i][j][2] = pt[i+1][(j+1)%edge]; vert[i][j][3] = pt[i+1][j]; } } const vertices = new Float32Array(vert.flat(3)); //1次元配列に変換
  const vert = [];
  for(let i=0; i<sect; i++){
      vert[i] = [];
      for(let j=0; j<edge; j++){
          vert[i][j] = [];
          vert[i][j][0] = pt[i][j];
          vert[i][j][1] = pt[i][(j+1)%edge]; //edgeを一周回ったら0に戻る
          vert[i][j][2] = pt[i+1][(j+1)%edge];
          vert[i][j][3] = pt[i+1][j];
      }
  }
  const vertices = new Float32Array(vert.flat(3)); //1次元配列に変換

下図のような順番に座標の順番を整理した後でverticesを作成している。

③indicesの作成

面を貼る順番が表側になるように(前回の記事参照)ひとつめの四角(0⇒3⇒2⇒2⇒1⇒0)ふたつめの四角(4⇒7⇒6⇒6⇒5⇒4)の要領で四角の数ぶんindexの順番を入れていく。

Plain text
Copy to clipboard
Open code in new window
EnlighterJS 3 Syntax Highlighter
const num_rect = sect * edge;
const order = [0,3,2,2,1,0];
const index = [];
for(let i=0; i<num_rect; i++){
for(let j=0; j<order.length; j++){
indx.push(order[j]+(4*i));
}
}
const indices = new Uint16Array(index);
const num_rect = sect * edge; const order = [0,3,2,2,1,0]; const index = []; for(let i=0; i<num_rect; i++){ for(let j=0; j<order.length; j++){ indx.push(order[j]+(4*i)); } } const indices = new Uint16Array(index);
  const num_rect = sect * edge;
  const order = [0,3,2,2,1,0];
  const index = [];
  for(let i=0; i<num_rect; i++){
      for(let j=0; j<order.length; j++){
          indx.push(order[j]+(4*i));
    }
  }
  const indices = new Uint16Array(index);

④バッファーオブジェクトの作成

頂点座標とインデックスをアトリビュートするところは前回と一緒だが、さらにcomputeVertexNormals()で法線向きを計算してあげる必要がある。

Plain text
Copy to clipboard
Open code in new window
EnlighterJS 3 Syntax Highlighter
 const geometry = new THREE.BufferGeometry();
geometry.addAttribute('position', new THREE.BufferAttribute(vertices, 3));
geometry.setIndex(new THREE.BufferAttribute(indices, 1));
geometry.computeVertexNormals();
 const geometry = new THREE.BufferGeometry(); geometry.addAttribute('position', new THREE.BufferAttribute(vertices, 3)); geometry.setIndex(new THREE.BufferAttribute(indices, 1)); geometry.computeVertexNormals();
 const geometry = new THREE.BufferGeometry();
  geometry.addAttribute('position', new THREE.BufferAttribute(vertices, 3));
  geometry.setIndex(new THREE.BufferAttribute(indices, 1));
  geometry.computeVertexNormals();

⑤メッシュを作成

あとは任意のマテリアルでメッシュを作成する。

結果が分かりやすいようにノーマルが色付けされるマテリアルを使って、ワイヤーフレーム表示させてみる。

Plain text
Copy to clipboard
Open code in new window
EnlighterJS 3 Syntax Highlighter
const material = new THREE.MeshNormalMaterial({
side:THREE.DoubleSide, //面の裏側も表示する
wireframe:true
});
const plane = new THREE.Mesh( geometry, material );
scene.add( plane );
const material = new THREE.MeshNormalMaterial({ side:THREE.DoubleSide, //面の裏側も表示する wireframe:true }); const plane = new THREE.Mesh( geometry, material ); scene.add( plane );
  const material = new THREE.MeshNormalMaterial({
    side:THREE.DoubleSide, //面の裏側も表示する
    wireframe:true
  });
  const plane = new THREE.Mesh( geometry, material );

  scene.add( plane );

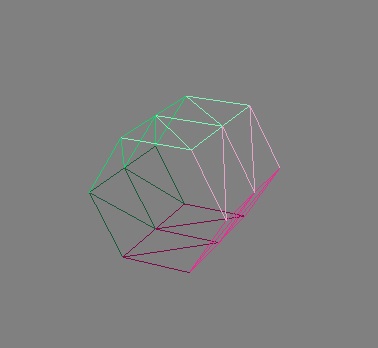
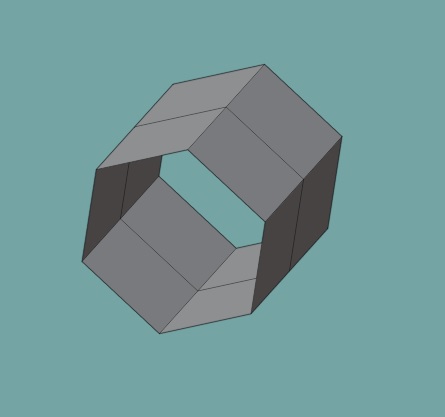
結果はこんな感じ。(正面からだと図形がわかりにくいのでカメラのポジションをちょっとずらしている)

さらにedgeの数を増やせば円錐に近づく。(カメラ左から見るとノーマルの色が変わる)

three.jsでカスタム図形を作る(1)

自分で座標を自由に作って図形を表示させる時のやり方。

先ずはシンプルな四角い板を作ってみる。

①verticesの作成

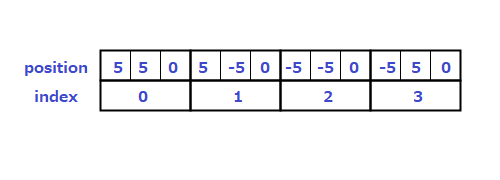
それぞれの頂点のx,y,z座標を配列に詰める。

Plain text
Copy to clipboard
Open code in new window
EnlighterJS 3 Syntax Highlighter
const positions = [
5.0, 5.0, 0.0, //頂点0
5.0, -5.0, 0.0, //頂点1
-5.0, -5.0, 0.0, //頂点2
-5.0, 5.0, 0.0 //頂点3
];
const vertices = new Float32Array(positions);
const positions = [ 5.0, 5.0, 0.0, //頂点0 5.0, -5.0, 0.0, //頂点1 -5.0, -5.0, 0.0, //頂点2 -5.0, 5.0, 0.0 //頂点3 ]; const vertices = new Float32Array(positions);
  const positions = [
        5.0,  5.0, 0.0, //頂点0
        5.0, -5.0, 0.0, //頂点1
       -5.0, -5.0, 0.0, //頂点2
       -5.0,  5.0, 0.0  //頂点3
  ];
  const vertices = new Float32Array(positions);

②indicesの作成

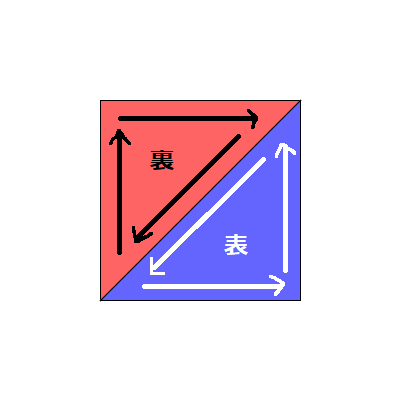
次に、さっき指定した座標に面を貼っていく。面は三角形単位で貼る必要がある。この時、三角形を貼る順番によって法線の向きが変わる。反時計回りに貼った面は表側になり、その逆だと面が裏側になる。

表側の面を貼りたいので、頂点0⇒頂点3⇒頂点2、頂点2⇒頂点1⇒頂点0のように三角形の面を貼る順番をindices配列に入れていく。

Plain text
Copy to clipboard
Open code in new window
EnlighterJS 3 Syntax Highlighter
const order = [0,3,2,2,1,0];
const indices = new Uint16Array(order);
const order = [0,3,2,2,1,0]; const indices = new Uint16Array(order);
  const order = [0,3,2,2,1,0];
  const indices = new Uint16Array(order);

③バッファーオブジェクトの作成

バッファーオブジェクトを作成し、さっき作った頂点座標とインデックス情報を与える。

Plain text
Copy to clipboard
Open code in new window
EnlighterJS 3 Syntax Highlighter
const geometry = new THREE.BufferGeometry();
geometry.addAttribute('position', new THREE.BufferAttribute(vertices, 3));
geometry.setIndex(new THREE.BufferAttribute(indices, 1));
const geometry = new THREE.BufferGeometry(); geometry.addAttribute('position', new THREE.BufferAttribute(vertices, 3)); geometry.setIndex(new THREE.BufferAttribute(indices, 1));
  const geometry = new THREE.BufferGeometry();
  geometry.addAttribute('position', new THREE.BufferAttribute(vertices, 3));
  geometry.setIndex(new THREE.BufferAttribute(indices, 1));

positionにはvertices配列のデータが3つずつ入り、index番号に対応した順番で面が作られる。

④メッシュを作成してシーンに追加

あとは好きなマテリアルを選んでメッシュを作成してシーンに表示させることができる。

Plain text
Copy to clipboard
Open code in new window
EnlighterJS 3 Syntax Highlighter
const material = new THREE.MeshLambertMaterial({color: 0x6699FF});
const plane = new THREE.Mesh( geometry, material );
scene.add( plane );
const material = new THREE.MeshLambertMaterial({color: 0x6699FF}); const plane = new THREE.Mesh( geometry, material ); scene.add( plane );
  const material = new THREE.MeshLambertMaterial({color: 0x6699FF});
  const plane = new THREE.Mesh( geometry, material );
  scene.add( plane );

three.jsでシェーダーを使う基本

three.jsを使って、板ポリに画像を表示させる手順の覚書。

まず、以下はthree.jsでブラウザにまっさらの画面を表示させるために必要な最小限の構成。

画面を表示する

three.js

Plain text
Copy to clipboard
Open code in new window
EnlighterJS 3 Syntax Highlighter
//ページの読み込みを待つ
window.addEventListener('load', init);
function init() {
//画面サイズを指定
const width = 800;
const height = 400;
//レンダラーを作成
const renderer = new THREE.WebGLRenderer({
canvas: document.querySelector('#myCanvas')
});
renderer.setClearColor(new THREE.Color('grey'));//背景色の設定
document.body.appendChild( renderer.domElement );
renderer.setSize(width, height);
//シーンを作成
const scene = new THREE.Scene();
//カメラを作成
const camera = new THREE.PerspectiveCamera(45, width / height);
camera.position.set(0, 0, 100);
camera.lookAt(new THREE.Vector3(0, 0, 0));
//ライトを設置
const envlight = new THREE.AmbientLight(0xffffff, 1);
scene.add(envlight);
 //レンダリング開始
render();
function render(){
requestAnimationFrame(render);
renderer.render(scene, camera);
}
}
//ページの読み込みを待つ window.addEventListener('load', init); function init() { //画面サイズを指定 const width = 800; const height = 400; //レンダラーを作成 const renderer = new THREE.WebGLRenderer({ canvas: document.querySelector('#myCanvas') }); renderer.setClearColor(new THREE.Color('grey'));//背景色の設定 document.body.appendChild( renderer.domElement ); renderer.setSize(width, height); //シーンを作成 const scene = new THREE.Scene(); //カメラを作成 const camera = new THREE.PerspectiveCamera(45, width / height); camera.position.set(0, 0, 100); camera.lookAt(new THREE.Vector3(0, 0, 0)); //ライトを設置 const envlight = new THREE.AmbientLight(0xffffff, 1); scene.add(envlight);  //レンダリング開始 render(); function render(){ requestAnimationFrame(render); renderer.render(scene, camera); } }
//ページの読み込みを待つ
window.addEventListener('load', init);

function init() {

  //画面サイズを指定
  const width = 800;
  const height = 400;

  //レンダラーを作成
  const renderer = new THREE.WebGLRenderer({
        canvas: document.querySelector('#myCanvas')
      });
  renderer.setClearColor(new THREE.Color('grey'));//背景色の設定
  document.body.appendChild( renderer.domElement );
  renderer.setSize(width, height);

  //シーンを作成
  const scene = new THREE.Scene();

  //カメラを作成
  const camera = new THREE.PerspectiveCamera(45, width / height);
  camera.position.set(0, 0, 100);
  camera.lookAt(new THREE.Vector3(0, 0, 0));

  //ライトを設置
  const envlight = new THREE.AmbientLight(0xffffff, 1);
  scene.add(envlight);

 //レンダリング開始
  render();

  function render(){
      requestAnimationFrame(render);
      renderer.render(scene, camera);
  }
}

index.html

Plain text
Copy to clipboard
Open code in new window
EnlighterJS 3 Syntax Highlighter
<!DOCTYPE html>
<html>
<head>
<meta charset="utf-8"/>
<!-- 必要ソース読み込み -->
<script src="https://cdnjs.cloudflare.com/ajax/libs/three.js/105/three.min.js"></script>
<script src="three.js"></script>
</head>
<body>
<canvas id="myCanvas"></canvas>
</body>
</html>
<!DOCTYPE html> <html> <head> <meta charset="utf-8"/> <!-- 必要ソース読み込み --> <script src="https://cdnjs.cloudflare.com/ajax/libs/three.js/105/three.min.js"></script> <script src="three.js"></script> </head> <body> <canvas id="myCanvas"></canvas> </body> </html>
<!DOCTYPE html>
<html>
  <head>
    <meta charset="utf-8"/>
    <!-- 必要ソース読み込み -->
    <script src="https://cdnjs.cloudflare.com/ajax/libs/three.js/105/three.min.js"></script>
    <script src="three.js"></script>
  </head>
  <body>
    <canvas id="myCanvas"></canvas>
  </body>
</html>

シェーダーを作成する

さらに、<BODY>内にシェーダーの記述を追加する。以下は、メッシュの全ピクセルを赤一色で塗るだけのシェーダー。

Plain text
Copy to clipboard
Open code in new window
EnlighterJS 3 Syntax Highlighter
<div id="webgl"></div>
<!-- 頂点シェーダー -->
<script id="vert" type="x-shader/x-vertex">
void main() {
//positionはShaderMaterialで補完されるジオメトリの頂点情報
//カメラ座標に変換したものを最終的にgl_Positionに代入
vec4 pos = modelViewMatrix * vec4(position, 1.0);
gl_Position = projectionMatrix * pos;
}
</script>
<!-- フラグメントシェーダー -->
<script id="frag" type="x-shader/x-fragment">
void main() {
//全ピクセルを赤にする
gl_FragColor = vec4(1.0, 0.0, 0.0, 1.0);
}
</script>
<div id="webgl"></div> <!-- 頂点シェーダー --> <script id="vert" type="x-shader/x-vertex"> void main() { //positionはShaderMaterialで補完されるジオメトリの頂点情報 //カメラ座標に変換したものを最終的にgl_Positionに代入 vec4 pos = modelViewMatrix * vec4(position, 1.0); gl_Position = projectionMatrix * pos; } </script> <!-- フラグメントシェーダー --> <script id="frag" type="x-shader/x-fragment"> void main() { //全ピクセルを赤にする gl_FragColor = vec4(1.0, 0.0, 0.0, 1.0); } </script>
<div id="webgl"></div>
<!-- 頂点シェーダー -->
<script id="vert" type="x-shader/x-vertex">
    void main() {
        //positionはShaderMaterialで補完されるジオメトリの頂点情報
        //カメラ座標に変換したものを最終的にgl_Positionに代入
        vec4 pos = modelViewMatrix * vec4(position, 1.0);
        gl_Position = projectionMatrix * pos;
    }
</script>
<!-- フラグメントシェーダー -->
<script id="frag" type="x-shader/x-fragment">
    void main() {
        //全ピクセルを赤にする
        gl_FragColor = vec4(1.0, 0.0, 0.0, 1.0);
    }
</script>

Thee.js側でプレーン(板)を追加し、マテリアルに↑で作ったシェーダーを指定すると、赤い板が出てくるはず。。

Plain text
Copy to clipboard
Open code in new window
EnlighterJS 3 Syntax Highlighter
//(1)Planeジオメトリ(座標)を作成
const geometry = new THREE.PlaneGeometry( 15, 20, 1 );
//(2)マテリアル(材質)にShaderMaterialを指定する
//htmlからvertとfragのソースを読み込んで指定
const vert = document.getElementById('vert').textContent;
const frag = document.getElementById('frag').textContent;
const material = new THREE.ShaderMaterial({
vertexShader: vert,
fragmentShader: frag,
});
//(3)ジオメトリとマテリアルからメッシュを作成
const plane = new THREE.Mesh( geometry, material );
//(4)メッシュをシーンに追加
scene.add( plane );
//(1)Planeジオメトリ(座標)を作成 const geometry = new THREE.PlaneGeometry( 15, 20, 1 ); //(2)マテリアル(材質)にShaderMaterialを指定する //htmlからvertとfragのソースを読み込んで指定 const vert = document.getElementById('vert').textContent; const frag = document.getElementById('frag').textContent; const material = new THREE.ShaderMaterial({ vertexShader: vert, fragmentShader: frag, }); //(3)ジオメトリとマテリアルからメッシュを作成 const plane = new THREE.Mesh( geometry, material ); //(4)メッシュをシーンに追加 scene.add( plane );
//(1)Planeジオメトリ(座標)を作成
const geometry = new THREE.PlaneGeometry( 15, 20, 1 );
//(2)マテリアル(材質)にShaderMaterialを指定する
//htmlからvertとfragのソースを読み込んで指定
const vert = document.getElementById('vert').textContent;
const frag = document.getElementById('frag').textContent;
const material = new THREE.ShaderMaterial({
    vertexShader: vert,
    fragmentShader: frag,
});
//(3)ジオメトリとマテリアルからメッシュを作成
const plane = new THREE.Mesh( geometry, material );
//(4)メッシュをシーンに追加
scene.add( plane );

シェーダーを使ってテクスチャを表示させる

表示させたいpng画像を配置(ここではimgフォルダ配下にfire.pngを配置)。テクスチャとして適用する。pngのアルファ値を反映させたい場合はtransparantをtrueにする。

Plain text
Copy to clipboard
Open code in new window
EnlighterJS 3 Syntax Highlighter
//テクスチャローダーを作成し画像を読み込む
const loader = new THREE.TextureLoader();
const tex = loader.load('img/fire.png');
//uniform変数uTexとしてテクスチャをシェーダーに渡す
const material = new THREE.ShaderMaterial({
uniforms: { uTex: { value: tex } }, //uTexとしてテクスチャ情報をセット
transparent: true, //画像の透明度を有効に
vertexShader: vert,
fragmentShader: frag,
});
//テクスチャローダーを作成し画像を読み込む const loader = new THREE.TextureLoader(); const tex = loader.load('img/fire.png'); //uniform変数uTexとしてテクスチャをシェーダーに渡す const material = new THREE.ShaderMaterial({ uniforms: { uTex: { value: tex } }, //uTexとしてテクスチャ情報をセット transparent: true, //画像の透明度を有効に vertexShader: vert, fragmentShader: frag, });
//テクスチャローダーを作成し画像を読み込む
const loader = new THREE.TextureLoader();
const tex = loader.load('img/fire.png');

//uniform変数uTexとしてテクスチャをシェーダーに渡す
const material = new THREE.ShaderMaterial({
    uniforms: { uTex: { value: tex } }, //uTexとしてテクスチャ情報をセット
    transparent: true, //画像の透明度を有効に
    vertexShader: vert,
    fragmentShader: frag,
 });
Plain text
Copy to clipboard
Open code in new window
EnlighterJS 3 Syntax Highlighter
<script id="vert" type="x-shader/x-vertex">
varying vec2 vUv; //フラグメントシェーダーに頂点情報を渡す用の変数
void main() {
vUv = uv; //頂点情報を格納する
vec4 pos = modelViewMatrix * vec4(position, 1.0);
gl_Position = projectionMatrix * pos;
}
</script>
<script id="frag" type="x-shader/x-fragment">
varying vec2 vUv; //頂点シェーダから渡された変数
uniform sampler2D uTex; //three.jsから渡されたテクスチャ情報
void main() {
vec4 color = texture2D( uTex, vUv ).rgba; //頂点ごとのテクスチャの色取得
gl_FragColor = color;
}
</script>
<script id="vert" type="x-shader/x-vertex"> varying vec2 vUv; //フラグメントシェーダーに頂点情報を渡す用の変数 void main() { vUv = uv; //頂点情報を格納する vec4 pos = modelViewMatrix * vec4(position, 1.0); gl_Position = projectionMatrix * pos; } </script> <script id="frag" type="x-shader/x-fragment"> varying vec2 vUv; //頂点シェーダから渡された変数 uniform sampler2D uTex; //three.jsから渡されたテクスチャ情報 void main() { vec4 color = texture2D( uTex, vUv ).rgba; //頂点ごとのテクスチャの色取得 gl_FragColor = color; } </script>
<script id="vert" type="x-shader/x-vertex"> 
    varying vec2 vUv; //フラグメントシェーダーに頂点情報を渡す用の変数
    void main() {
        vUv = uv; //頂点情報を格納する
        vec4 pos = modelViewMatrix * vec4(position, 1.0);
        gl_Position = projectionMatrix * pos;
    }
</script>

<script id="frag" type="x-shader/x-fragment">
    varying vec2 vUv; //頂点シェーダから渡された変数
    uniform sampler2D uTex; //three.jsから渡されたテクスチャ情報
    void main() {
        vec4 color = texture2D( uTex, vUv ).rgba; //頂点ごとのテクスチャの色取得
        gl_FragColor = color;
    }
</script>

ここでブラウザのクロスプラットフォームを無効化しないと描画されないので注意。