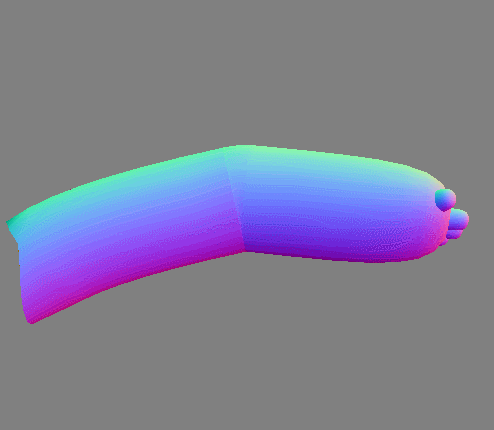
今回で腕は完成です。
指を追加する
const fingerObj = new Limbs();
function armInit(){
//パラメータの設定
const fingerLength = upperArmLength / 10; //よさげな長さ
const fingerThick = upperArmThick / 5; //よさげな太さ
const fingerThicks = new Array( limbSeg );
for( let i=0; i<( limbSeg+1 ); i++ ){
//太さ段々すぼめて最後は0(閉じる)
const t = i / limbSeg;
fingerThicks[i] = fingerThick - Math.pow( t, 3 ) * fingerThick;
}
fingerObj.ep = new THREE.Vector2( fingerLength,0 );
fingerObj.cp = new THREE.Vector2( fingerLength,0 );
fingerObj.thick = fingerThicks;
fingerObj.width = fingerThicks;
//meshの作成
lastValClear(); //lastPos, lastAngleの初期化
const fingerPt = makePipePt( fingerObj );
const fingerGeo = makeGeometry( fingerObj, fingerPt );
//指の立て付け
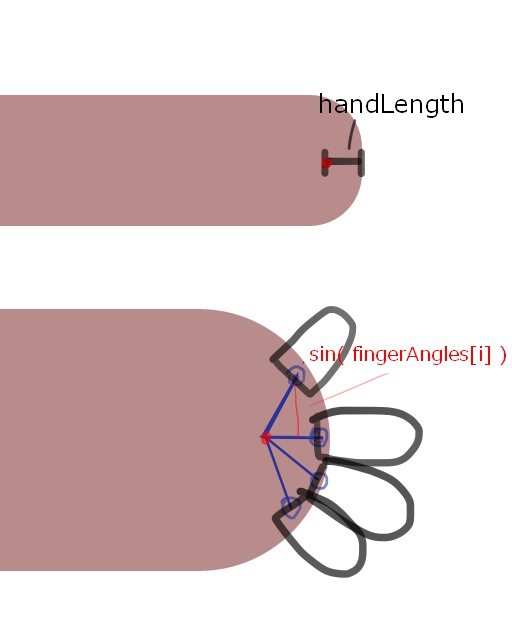
const fingerAngles = [ -PI/4, -PI/8, 0, PI/4 ];
const handLength = ( upperArmLength + lowerArmLength ) * 0.11;
for( let i=0; i<4; i++ ){
const fingerMesh = new THREE.Mesh( fingerGeo, armMat );
const z = ( upperArmThick*0.8 ) * Math.sin( fingerAngles[i] ); //指meshのz位置
const x = ( upperArmThick*0.8 ) * Math.cos( fingerAngles[i] ); //指meshのx位置
fingerMesh.rotation.y = -fingerAngles[i]; //指meshを回転
fingerMesh.position.set( x - ( handLength ), 0, z ); //handLength分だけ中に入れる
//作成したmeshをhandGグループに追加(4つ分)
handG.add( fingerMesh );
}
//lowerArmグループに追加
lowerArmG.add( handG );
}
//lastPos, lastAngleの初期化関数
function lastValClear(){
lastAngle = 0;
lastPos = new THREE.Vector2();
}
指の形状のメッシュを4個分作る。
fingerAnglesの角度に指をくっつける。
なお、指はちっちゃく作るので、特に曲げたりは想定してない。
腕のジオメトリを更新する関数(armUpdate)の最後に、handG(指のグループ)の座標と角度を更新する処理を入れる。
function armUpdate( angle1, angle2 ){
    //upperArm
    lastValClear();
    upperArmUpdate( angle1 );
    //lowerArm
    lowerArmUpdate( angle2 );
    //hand
    handG.rotation.z = lastAngle;    //角度を更新
    handG.position.set( lastPos.x, lastPos.y, 0 );  //位置を更新
}
回転を追加する
armupdate関数に処理を追加して、腕全体(armG)と、ひじから先(lowerArmG)を個別に回転できるようにする。
function armUpdate( angle1, angle2, rotate1, rotate2 ){
    //upperArm
    lastValClear();
    upperArmUpdate( angle1 );
    //lowerArm
    const r = lastAngle;     //upperArmの最終の角度をとっておく
    lowerArmUpdate( angle2 );
    //hand
    handG.rotation.z = lastAngle;
    handG.position.set( lastPos.x, lastPos.y, 0 );
    //回転の処理
    armG.quaternion.set( 0,0,0,1 );
    lowerArmG.quaternion.set( 0,0,0,1 );
    const axis1 = new THREE.Vector3( 1,0,0 );
    const axis2 = new THREE.Vector3( Math.cos(r),Math.sin(r),0 ).normalize();
    const q1 = new THREE.Quaternion().setFromAxisAngle( axis1, rotate1 );
    const q2 = new THREE.Quaternion().setFromAxisAngle( axis2, rotate2 );
    armG.applyQuaternion( q1 );
    lowerArmG.applyQuaternion( q2 );
}
回転にはクオータニオンを使う。クオータニオンの細かいことは分からないが、とりあえず任意の軸にそってメッシュを回転させる、というのが実現できればよい。
まずそれぞれメッシュの回転を初期化。
armG.quaternion.set( 0,0,0,1 );
lowerArmG.quaternion.set( 0,0,0,1 );
次に回転させたい軸の設定をする。腕全体はx軸にそって回転させればいいので、axis1に(1,0,0)のベクトルを設定。
ひじから先はupperArmの曲がっている方向を軸にして回転させたいので、upperArmの最後の角度からベクトルを計算する。

const axis1 = new THREE.Vector3( 1,0,0 );
const axis2 = new THREE.Vector3( Math.cos(r),Math.sin(r),0 ).normalize();
軸に設定するベクトルは正規化されている必要があるので注意。
最後に、setFromAxisAngleメソッドでそれぞれの軸と回転させたい角度を設定し、メッシュのグループに適用する。
const q1 = new THREE.Quaternion().setFromAxisAngle( axis1, rotate1 );
const q2 = new THREE.Quaternion().setFromAxisAngle( axis2, rotate2 );
armG.applyQuaternion( q1 );
lowerArmG.applyQuaternion( q2 );
アニメーション
アニメーションループに腕の回転の動きも追加する。
armGの回転はrotVal1、lowerArmGの回転はrotVal2に値の推移をセットしている。
アニメーションの値を書き込むようのオブジェクトの、positionのプロパティには腕の曲げ角度の方を入れているので、回転はscaleのプロパティを使うことにした。
それぞれのキーフレームを配列としてAnimationClipに渡すことで、同時に曲げと回転の値をアニメーションできる。
const upperArmMove = new THREE.Object3D();
//armUpdateに渡すangleとrotateの値をセット
const dur = [ 0, 2, 4 ];
const posVal1 = [ -0.5, 0, -0.5 ];
const posVal2 = [ 0, 1.5, 0 ];
const rotVal1 = [ 0, 0, 0 ];
const rotVal2 = [ 0, -PI, 0 ];
//配列の形にする
const upperArmPos = [];
const upperArmRot = [];
for( let i=0; i<dur.length; i++ ){
    upperArmPos.push( posVal1[i] );
    upperArmPos.push( posVal2[i] );
    upperArmPos.push( 0 );
    upperArmRot.push( rotVal1[i] );
    upperArmRot.push( rotVal2[i] );
    upperArmRot.push( 0 );
}

//それぞれのキーフレームを作りclipに配列として追加
const uppperArmKF1 = new THREE.NumberKeyframeTrack( '.position', dur, upperArmPos );
const uppperArmKF2 = new THREE.NumberKeyframeTrack( '.scale', dur, upperArmRot );
const clip = new THREE.AnimationClip( 'Action', 4, [ uppperArmKF1, uppperArmKF2 ] );
レンダリングサイクル内でarmUpdate関数を呼び出す。
const clock = new THREE.Clock();
render();
function render(){
    //animation update
    mixer.update(clock.getDelta());
    let angle1 = upperArmMove.position.x;
    let angle2 = upperArmMove.position.y;
    let rot1 = upperArmMove.scale.x;
    let rot2 = upperArmMove.scale.y;
    armUpdate( angle1, angle2, rot1, rot2 );

    //cycle
    requestAnimationFrame(render);
    renderer.render(scene, camera);
}