blenderで作成した3DモデルをARで表示するまで。
①blenderでモデルをglbとしてエクスポート
②three.jsのGLTFLoaderでモデルを読み込み
③AR.jsでモデルを表示
という流れ。
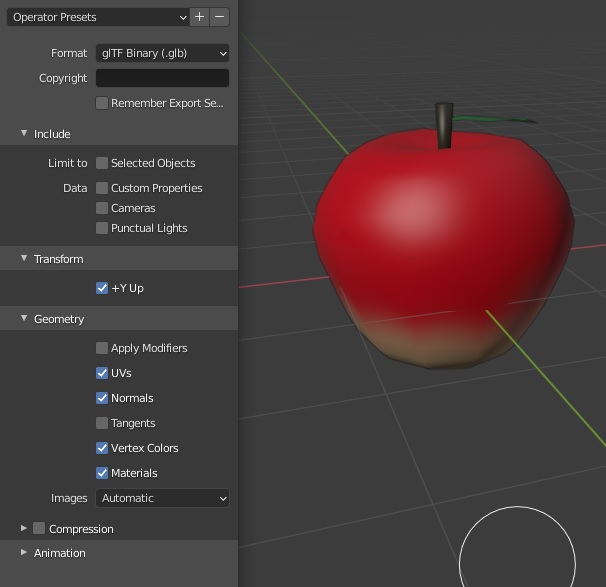
blenderでモデルをエクスポート
フォーマットはglTF Binary(.glb)が一番軽いのでこれを選択。
パラメータはとりあえず以下のチェックが入っていればテクスチャ等もそのまま出力される様子。
※この時マテリアルをDeffuse BSDFにしたところブラウザの方でうまくテクスチャが反映されなかったので、Principled BSDFのままのほうがいいっぽい。
html側の記述
<!DOCTYPE html>
<html>
    <head>
        <title>AR test</title>
        <meta name="viewport" content="width=device-width, user-scalable=no"/>
        <script src="https://cdnjs.cloudflare.com/ajax/libs/three.js/r123/three.min.js"></script>
        <script src="https://raw.githack.com/AR-js-org/AR.js/3.1.0/three.js/build/ar.js"></script>
        <script src="https://cdn.jsdelivr.net/gh/mrdoob/three.js@r92/examples/js/loaders/GLTFLoader.js"></script>
        <script src="three.js"></script>
    </head>
    <body style='margin : 0px; overflow: hidden;'></body>
</html>
・ビューポートの設定。画面をデバイスの大きさに合わせる。またスマホのズーム操作を禁止
・必要ソースの読み込み
・bodyタグで余白の除去とスクロールの禁止
three.js側の記述
まずARの表示に最低限必要な画面設定のみ
window.addEventListener("DOMContentLoaded", init);

function init() {
    //レンダラーの設定
    const renderer = new THREE.WebGLRenderer({
        antialias: true,
        alpha: true
    });
    renderer.setClearColor(new THREE.Color(), 0);
    renderer.setSize(640, 480);
    renderer.domElement.style.position = 'absolute';
    renderer.domElement.style.top = '0px';
    renderer.domElement.style.left = '0px';
    document.body.appendChild(renderer.domElement);

    //画面設定
    const scene = new THREE.Scene();
    scene.visible = false;
    const camera = new THREE.Camera();
    scene.add(camera);
    const light = new THREE.AmbientLight(0xFFFFFF, 1.0);
    scene.add(light);

    //画面リサイズの設定
    window.addEventListener('resize', () => {
        onResize();
    });
    function onResize() {
        arToolkitSource.onResizeElement();
        arToolkitSource.copyElementSizeTo(renderer.domElement);
        if (arToolkitContext.arController !== null) {
            arToolkitSource.copyElementSizeTo(arToolkitContext.arController.canvas);
        }
    };

    //AR周りの設定
    const arToolkitSource = new THREEx.ArToolkitSource({
        sourceType: 'webcam'
    });
    arToolkitSource.init(() => {
        setTimeout(() => {
            onResize();
        }, 2000);
    });
    const arToolkitContext = new THREEx.ArToolkitContext({
        cameraParametersUrl: 'data/camera_para.dat',
        detectionMode: 'mono'
    });
    arToolkitContext.init(() => {
        camera.projectionMatrix.copy(arToolkitContext.getProjectionMatrix());
    });

    //マーカー設定
    const marker1 = new THREE.Group();
    scene.add(marker1);
    const arMarkerControls = new THREEx.ArMarkerControls(arToolkitContext, marker1, {
        type: 'pattern',
        patternUrl: 'data/patt.hiro',
    });

    //レンダリング
    requestAnimationFrame(function animate(){
        requestAnimationFrame(animate);
        if (arToolkitSource.ready) {
            arToolkitContext.update(arToolkitSource.domElement);
            scene.visible = camera.visible;
        }
        renderer.render(scene, camera);
    });
}
arToolkitSource初期化時のリサイズ処理は2秒待つ処理を入れないと自分の環境ではうまくいかなかった(公式のexsampleでは意図的に待つ処理を入れている)。
モデルの読み込みと表示
GLTFローダーでモデルを読み込み、マーカーに対応させることで表示
      const gltfloader = new THREE.GLTFLoader();
      gltfloader.load('./data/apple.gltf',function(gltf){
          marker1.add(gltf.scene);
      });
・’./data/apple.gltf’はモデルデータのURL
・モデルそのものではなくシーンを追加していることに注意